Mastering nades is crucial for dominating in CS2, but the map reworks and new smoke mechanics mean old lineups no longer work. Don’t fret! This guide covers powerful practice commands to help you refine your throws and achieve pro-level utility mastery. We’ll cover essential commands for smooth practice sessions and provide a perfect nade practice config, so you can learn lineups efficiently and dominate the competition with pinpoint precision.
Table of Contents
How to Practice Nade Lineups in CS2
The first step in mastering CS2 grenade throws is hopping into a practice server with the right setup. This environment allows you to experiment with different throws and lineups without the pressure of a live match. Here’s how to do it:
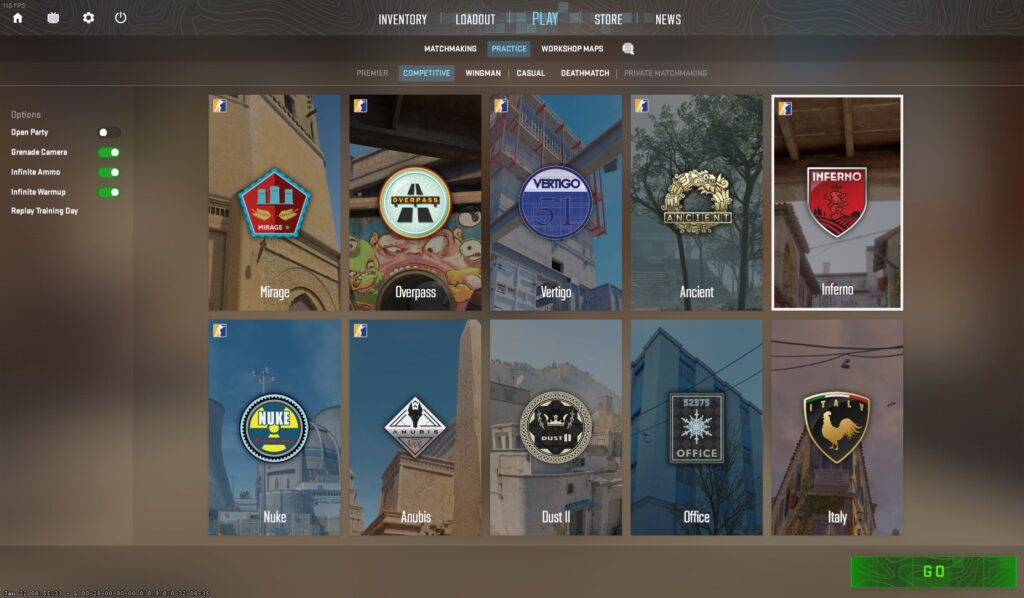
1. Launching Your Practice Session: Start by opening Counter-Strike 2. Navigate to ‘Play’ and select ‘Practice Competitive’. Choose the map you want to practice on. This step is crucial as each map has unique layouts and spots where specific nade throws can be advantageous. Practice takes time, but you should try to learn at least the most basic lineups on each map in the competitive map pool.
2. Configuring Server Settings: In the server setup menu, you’ll find several options to tailor your practice session. Key settings include:
- Grenade Camera: This feature is essential for nade practice. It shows the trajectory and final position of your thrown grenades, giving you immediate feedback on your throws.
- Infinite Ammo: Enable this to get unlimited grenades and bullets. It saves time as you won’t need to reload or pick up new grenades constantly.
- Infinite Warm-Ups: Activating this means your round time never runs out, allowing for uninterrupted practice sessions.
After adjusting these settings, start the server by clicking ‘Go.’
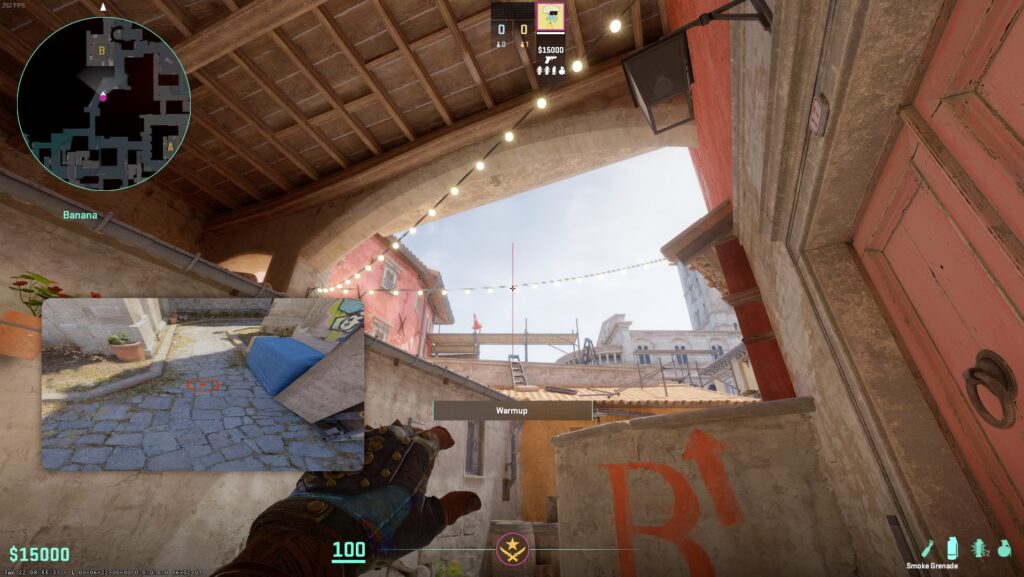
3. Practicing Throws: Now, practice throwing grenades. Notice the grenade camera’s feedback in the bottom left corner, showing where your nade will land. This is exceptionally helpful for fine-tuning your throws. For instance, if you’re practicing a smoke for a specific area, hold the grenade without releasing it to see its projected landing spot.
Essential CS2 Nade Practice Commands
Gaining proficiency in grenade usage in CS2 requires not only practice but also knowledge of essential commands that can streamline your training. These commands enable you to experiment with different throws and understand their effects efficiently. First, open your console and here’s a breakdown of the most important commands and how to use them:
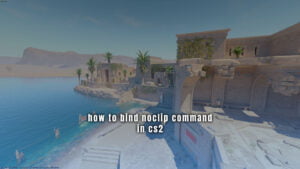
sv_cheats true– a necessary command to enable the use of other console commandsbind n noclip– allows you to fly around the map for quick positioning to observe where and how your nades landgive weapon_smokegrenade– command to equip yourself with smoke grenades in case for whatever reason, you don’t have one. This of course also work with other grenades or weapons likeweapon_flashbang,weapon_molotovetc.bind KEY "ent_fire smokegrenade_projectile kill;ent_fire molotov_projectile kill;ent_fire flashbang_projectile kill;ent_fire hegrenade_projectile kill;ent_fire decoy_projectile kill;stopsound"– an extremely helpful bind that will allow you to erase a smoke without having to wait for it to dissipate naturally or use thehost_timescalecommandsv_rethrow_last_grenade– this command replicates your last throw, allowing you to observe the same throw multiple times. Especially valuable to see where a flashbang pops and blinds the enemy
By incorporating these commands into your practice routine, you’ll be able to refine your grenade throwing skills significantly. These commands offer the flexibility to focus on specific areas, whether it’s mastering the perfect smoke for a bomb site or practicing flash throws for entry into a room.
What is a CS2 Nade Practice Config
A nade practice config file in CS2 is a set of predefined commands that configure your server with the necessary settings for grenade practice. This saves time as you don’t need to manually enter each command every time you start a practice session. A well-structured practice config in CS2 can transform your training sessions, making them more efficient and focused. Here’s how to create and use a practice config:
Creating Your Config File
Begin by opening a text editor on your computer. Copy and paste your CS2 nade practice commands into the text file – we recommend the following settings for the optimal CS2 nade practice experience:
// Server config
sv_cheats true
mp_limitteams 0
mp_autoteambalance false
mp_roundtime 60
mp_roundtime_defuse 60
mp_roundtime_hostage 60
mp_roundtime 60
mp_maxmoney 60000
mp_startmoney 60000
mp_freezetime 0
mp_buytime 9999
mp_buy_anywhere 1
sv_infinite_ammo 1
ammo_grenade_limit_total 6
mp_team_intro_time 0
bot_kick
mp_warmup_end
mp_respawn_on_death_ct True
mp_respawn_on_death_t True
mp_autokick false


// Practice
sv_grenade_trajectory_prac_pipreview true
sv_grenade_trajectory_prac_trailtime 8.000000
sv_grenade_trajectory_time_spectator 8.000000
sv_showimpacts 2
sv_showimpacts_time 5

mp_restartgame 1

sv_regeneration_force_on true
Once you’re done editing the commands, save this file with a .cfg extension, for example, cs2_nade_practice.cfg.
Placing the Config File in the Correct Folder
Locate your CS2 installation directory, you can do this by going into your Steam library, right clicking on CS2 > Manage > Browse Local Files. Navigate to Counter-Strike Global Offensive\game\csgo\cfg and copy your newly created config file into this folder. This ensures that CS2 can access and execute your config file.
Executing the Config in CS2
Launch CS2 and start a practice server as previously described. Once in the server, open the console and type exec cs2_nade_practice (name of the config file you created, without the .cfg). This command will execute your config file, applying all the settings and commands you’ve saved in it.
Your practice needs might change as you improve or focus on different aspects of grenade usage. Keep updating your config file to reflect these changes. By setting up a practice config, you’re not just streamlining your training process, you’re also creating a personalized practice environment that caters to your specific needs and goals in CS2. This targeted approach to practice can significantly enhance your skills and understanding of grenade mechanics.
Additional Tips & Tricks
After setting up your practice server, CS2 nade practice config and mastering basic grenade commands, it’s time to delve deeper into nade practice. Here are some tips and tricks:
- In CS2, you can throw grenades with 3 strength levels
- Left-click for long-distance throws
- Right-click for underhanded, short distance throws
- Both mouse buttons held down, for medium distance throws
- Learn how to jump-throw as soon as possible – this is an essential mechanic and skill that you won’t be able to utilize some of the more advanced nade lineups
- Utilize third-party tools and nade lineup resources to keep up with the meta and know which lineups you should be using for optimal smokes, flashes and molotovs
Through these advanced practices, you’ll not only improve your grenade skills but also develop a deeper tactical understanding of CS2. This can significantly impact your performance in competitive play, making you a valuable asset to any team.
FAQ
Why are grenades important in CS2?
Mastering grenades in CS2 is crucial for high-level gameplay. They provide tactical advantages for blocking vision, flushing out enemies, and securing areas. Knowing effective lineups and throws can give you a significant edge in competitive matches.
What is a CS2 nade practice config, and how does it benefit me?
A config file stores predefined commands that automatically configure your practice server with optimal settings. This saves time and creates a consistent practice environment tailored to your needs.